
SPF, DKIM, DMARC for Cold Emails
When sending cold emails, your messages face strict filters from providers like Gmail, Yahoo, and Outlook. Without proper email authentication, your emails might land in spam or get blocked. To ensure deliverability, you need to configure SPF, DKIM, and DMARC - three protocols that verify your identity as a sender and protect your domain from misuse.
SPF: Specifies which servers can send emails on your behalf.
DKIM: Adds a digital signature to confirm your email hasn't been altered.
DMARC: Sets rules for handling emails that fail SPF or DKIM checks.
Starting February 1, 2024, Gmail and Yahoo require bulk senders (5,000+ emails/day) to have these protocols in place. Outlook will enforce similar rules by May 5, 2025. Without these, even well-written cold emails risk being flagged as spam. Proper setup is critical for inbox placement and maintaining a strong sender reputation.
How to Configure SPF, DKIM, and DMARC for Your Domain
What is SPF and Why It Matters for Cold Emails
When it comes to cold email campaigns, proving that you're a legitimate sender isn't just helpful - it's essential. That's where Sender Policy Framework (SPF) comes into play. SPF is a DNS-based authentication protocol that tells email providers which mail servers are allowed to send messages on your domain's behalf. Here's how it works: when you send an email, the recipient's server performs a DNS lookup to check your SPF record. If the IP address of the sending server isn't listed, your email could be flagged as suspicious or outright rejected.
SPF is particularly important for cold email campaigns because it acts as a trust signal for providers like Gmail and Outlook. These platforms rely on SPF as a basic way to verify senders, and since many spammers skip this step, having SPF configured properly sets you apart as a legitimate sender. This has become even more critical with new rules: as of February 1, 2024, major providers require SPF and DKIM authentication for all senders. Outlook will also enforce stricter rules for high-volume senders starting May 5, 2025.
A technical detail worth noting: SPF validates the "Return-Path" address (RFC5321.MailFrom), which is used for bounce handling, rather than the visible "From" address that recipients see. When configured correctly, SPF can help you hit industry benchmarks like 95%+ delivery rates and 85%+ inbox placement. Without it, you're essentially asking email providers to trust your messages without any proof, which is a risky move.
How SPF Works
When your cold email arrives at a recipient's server, the server checks the "Mail From" address and runs a DNS lookup to find your SPF record. This record is a TXT entry in your DNS settings that lists the authorized servers for your domain. The server then compares the sending server's IP address to the list in your SPF record. If there's a match, the email passes authentication. If not, the server follows your specified policy, which could mean rejecting the email, flagging it as suspicious, or allowing it with a warning. This entire process happens in milliseconds - long before the recipient ever sees your email.
SPF records come with some strict technical limits. For example, a record can't exceed 255 characters and is capped at 10 DNS lookups. If you go over this limit, you'll get a "PermError", which means authentication fails. This can hurt your email deliverability, especially if you're using multiple services that each require an include statement in your SPF record.
The syntax of an SPF record is straightforward. It starts with v=spf1, followed by mechanisms that authorize specific IP addresses or services, and ends with a qualifier that sets your policy. For instance, v=spf1 include:_spf.google.com ~all allows Google Workspace to send emails on your behalf, while using a soft fail (~all) for unauthorized sources.
Setting Up SPF for Your Domain
Before you create your SPF record, make a list of every service that sends email using your domain. This includes your primary email provider (like Google Workspace or Microsoft 365), as well as CRMs, marketing tools, and email warm-up services. Missing even one authorized sender can cause legitimate emails to fail authentication.
Once you've got your list, log into your DNS provider (such as GoDaddy, Namecheap, or Cloudflare), navigate to the DNS management section, and add a TXT record for @ with your SPF value. Here's what that might look like:
Provider | SPF Record Value |
|---|---|
Google Workspace |
|
Microsoft 365 |
|
Multiple Services |
|
When setting up your SPF record, it's a good idea to start with ~all (soft fail). This lets unauthorized emails through but marks them as suspicious, giving you time to test and make sure all legitimate senders are included. Once you're confident everything is set up correctly, you can switch to -all (hard fail), which tells email servers to reject unauthorized emails outright. For example, Gmail requires bulk senders to keep spam complaint rates below 0.3%, so starting with a soft fail helps prevent accidentally blocking legitimate messages.
Make sure your domain has only one SPF record. Having multiple SPF records can cause authentication to fail. If you're getting close to the 10-lookup limit, consider using subdomains for different services. For example, you could use marketing.yourdomain.com for campaigns and sales.yourdomain.com for outreach, each with its own SPF record.
After updating your DNS, test your SPF record using tools like MXToolbox or other SPF checkers to confirm the syntax and lookup count. Keep in mind that DNS changes can take anywhere from a few hours to 48 hours to propagate globally.
What is DKIM and How It Improves Deliverability
While SPF checks which servers are authorized to send emails on your domain's behalf, DomainKeys Identified Mail (DKIM) goes further by ensuring the email's integrity during transit. DKIM adds a digital signature to outgoing emails, allowing the recipient's server to confirm that the email came from your domain and hasn't been altered. This is particularly important for cold email campaigns, as email providers often scrutinize unfamiliar senders.
DKIM uses public-key cryptography to maintain email integrity. When you send an email, your server signs it with a private key that only you control. The recipient's server then retrieves the matching public key from your DNS records to verify the signature. If a single character in the email is changed, the signature fails, and the DKIM check won't pass. This process not only confirms the sender's authenticity but also helps improve deliverability.
Both Gmail and Outlook enforce DKIM to ensure better deliverability. Starting February 1, 2024, Gmail requires bulk senders to implement both SPF and DKIM, while Outlook.com will enforce the same standards for high-volume senders beginning May 5, 2025. Without DKIM, cold emails are far more likely to end up in spam folders or be outright blocked.
"DKIM is the first and most important thing you need to set up before beginning email sends from any email marketing automation platform. With DKIM properly configured, you put your authentic self forward: proving that only you can send emails using your domain."
Al Iverson, Industry Research and Community Engagement Lead at Valimail
DKIM's ability to remain effective during email forwarding makes it more reliable than SPF, which often fails when the forwarding server isn't authorized. The DKIM signature stays attached to the message, offering a dependable signal for inbox providers. A 2024 study even found that 96.6% of published DKIM records were valid, showing that most senders who implement it do so correctly.
Security is another critical factor. Shorter keys, like 512-bit, are vulnerable to being cracked in as little as 24 hours for about $70. In contrast, 2048-bit keys are far more secure, with current computing power requiring an estimated 300 trillion years to crack them.
How DKIM Works
When an email is sent, DKIM creates a unique "hash" - a string of characters based on the email's content and specific headers (e.g., "From", "Subject", "Date"). This hash is encrypted with your private key to generate the digital signature, which is added to the email header. While invisible to recipients, this step is crucial for authentication.
The receiving server performs a DNS lookup to find your public key, which is published as a TXT record at [selector]._domainkey.[yourdomain].com. The selector is a custom string you choose (e.g., "google" or "marketing") that allows you to manage separate keys for different email services. This separation helps protect your domain's reputation if one service encounters issues.
The DKIM signature in the email header includes several tags that guide the receiving server during verification:
Tag | Meaning | Function |
|---|---|---|
v= | Version | Identifies the DKIM version (usually v=1) |
d= | Signing Domain | The domain responsible for the message |
s= | Selector | The string used to locate the public key in DNS |
h= | Signed Headers | Headers included in the signature (e.g., From, Subject) |
bh= | Body Hash | Ensures the email's content hasn't been altered |
b= | Digital Signature | The cryptographic signature of the headers and body |
If the receiving server successfully decrypts the signature and matches the hash, the DKIM check passes. Any changes to the email - even a single punctuation mark - will cause the authentication to fail.
Setting Up DKIM for Your Email Campaigns
Setting up DKIM is straightforward and follows a similar process across most major email platforms. You'll need to generate a public/private key pair through your email provider and publish the public key in your DNS records.
For Google Workspace, log into the Google Admin Console and navigate to Apps > Google Workspace > Gmail > Authenticate Email. Click "Generate new record" and choose the 2048-bit key option for stronger security. Google will provide you with a host name (e.g., google._domainkey) and a TXT value. Add this information as a new TXT record in your DNS settings (e.g., GoDaddy, Namecheap, or Cloudflare). Once completed, return to the Admin Console and click "Start authentication".
For Microsoft 365, go to the Microsoft 365 Defender portal, then navigate to Email & collaboration > Policies & rules > Threat policies > DKIM. Select your domain and generate the CNAME records provided by Microsoft. Add these records to your DNS settings, then return to the portal to enable DKIM signing for your domain.
After updating your DNS, allow up to 48 hours for global propagation. To confirm your setup, send a test email to a Gmail account, open the message, click the three dots in the top-right corner, and select "Show original." Look for "DKIM: PASS" along with your domain name - this confirms DKIM is properly configured.
Some best practices to keep in mind: assign a unique selector for each third-party email provider to isolate their reputations, rotate your DKIM keys every six to 12 months to reduce the risk of key compromise, and always opt for 2048-bit keys instead of 1024-bit ones, as the latter are increasingly considered weak.
DMARC: Adding a Layer of Email Security
DMARC (Domain-based Message Authentication, Reporting, and Conformance) is the final step in email authentication. It tells receiving servers how to handle emails that fail SPF or DKIM checks, helping protect your domain from phishing and spoofing attacks.
Starting February 1, 2024, Google and Yahoo will require any sender targeting their accounts with more than 5,000 emails daily to have a DMARC policy in place. This shift comes as phishing threats continue to rise, with billions of emails quarantined each year. Beyond meeting these requirements, DMARC helps email providers identify legitimate cold emails and separate them from fraudulent ones. This is particularly important when using AI sales agents for outreach to ensure high-volume campaigns maintain a human-like sender reputation.
The protocol relies on alignment, meaning the domain in your visible "From" address must match the domain authenticated by SPF or DKIM. If this alignment isn’t in place, your emails may fail DMARC - even if they pass SPF and DKIM individually. This issue is especially common in cold email campaigns, where AI SDRs and other third-party tools sometimes use their own domains for authentication, causing misalignment and deliverability problems.
To monitor your domain's email activity, you can include a rua tag in your DMARC record (e.g., rua=mailto:dmarc@yourdomain.com). This enables you to receive aggregate reports showing who is sending emails on your behalf and highlighting any unauthorized activity. Let’s take a closer look at how DMARC enforces these validations.
How DMARC Works
DMARC policies give you three ways to handle emails that fail authentication: none (monitor traffic without taking action), quarantine (send failing emails to the spam folder), or reject (block them completely).
The protocol also offers two alignment modes: strict and relaxed.
Strict alignment requires an exact domain match. For example, if your "From" address is
info@example.com, both your SPF and DKIM domains must also beexample.com.Relaxed alignment allows subdomains to differ, so
info@mail.example.comcan align withexample.com.
You can configure these settings using the aspf (for SPF) and adkim (for DKIM) tags, choosing "s" for strict or "r" for relaxed alignment.
DMARC Policy | Action Taken by Receiving Server | Recommended Use Case |
|---|---|---|
p=none | No action; email is delivered normally. | Ideal for initial setup and monitoring |
p=quarantine | Sends failing emails to spam/junk folder. | Use after validating legitimate senders |
p=reject | Blocks the email entirely; it is never delivered. | Best for maximum protection against spoofing |
To ease into enforcement, the pct (percentage) tag lets you apply DMARC policies gradually. For instance, setting pct=10 applies the policy to only 10% of your email traffic, allowing you to test its effects before scaling up to 100%.
Setting Up DMARC for Cold Emails
Before implementing DMARC for your cold email campaigns, ensure SPF and DKIM are properly configured. These foundational records are essential, and you’ll need to allow at least 48 hours for DNS changes to propagate.
To create a DMARC record, log into your DNS provider (e.g., GoDaddy, Namecheap, Cloudflare) and add a new TXT record. The host name should be _dmarc.yourdomain.com, and the value should follow this format:
v=DMARC1; p=none; rua=mailto:dmarc@yourdomain.com; pct=100; aspf=r; adkim=r
Here’s what each tag does:
v=DMARC1: Specifies the protocol version (required).
p=none: Defines the policy. Start with "none" to monitor email traffic.
rua=mailto:dmarc@yourdomain.com: Specifies where aggregate reports should be sent.
pct=100: Indicates the percentage of mail to filter (100% applies the policy to all mail).
aspf=r: Sets SPF alignment mode (relaxed in this example).
adkim=r: Sets DKIM alignment mode (relaxed in this example).
"Start with a none policy that only monitors email flow, and then eventually change to a policy that rejects all unauthenticated messages." - Google Workspace
After publishing your DMARC record, monitor the reports sent to your rua address. These reports will show which servers are sending emails on your behalf and whether they’re passing authentication. Pay special attention to any legitimate services that fail DMARC due to misalignment - this is a common issue with cold email tools that don’t properly configure their sending domains.
Once you’ve confirmed that all legitimate email streams are aligned and passing DMARC, you can gradually tighten your policy. Start with p=none, transition to p=quarantine for a few weeks, and finally move to p=reject for full protection. If you use subdomains for cold outreach (e.g., sales.brand.com), consider creating separate DMARC records for each subdomain to manage their reputations independently.
One critical rule: never publish more than one DMARC record for the same domain. Doing so will cause authentication to fail.
SPF, DKIM, and DMARC: Side-by-Side Comparison
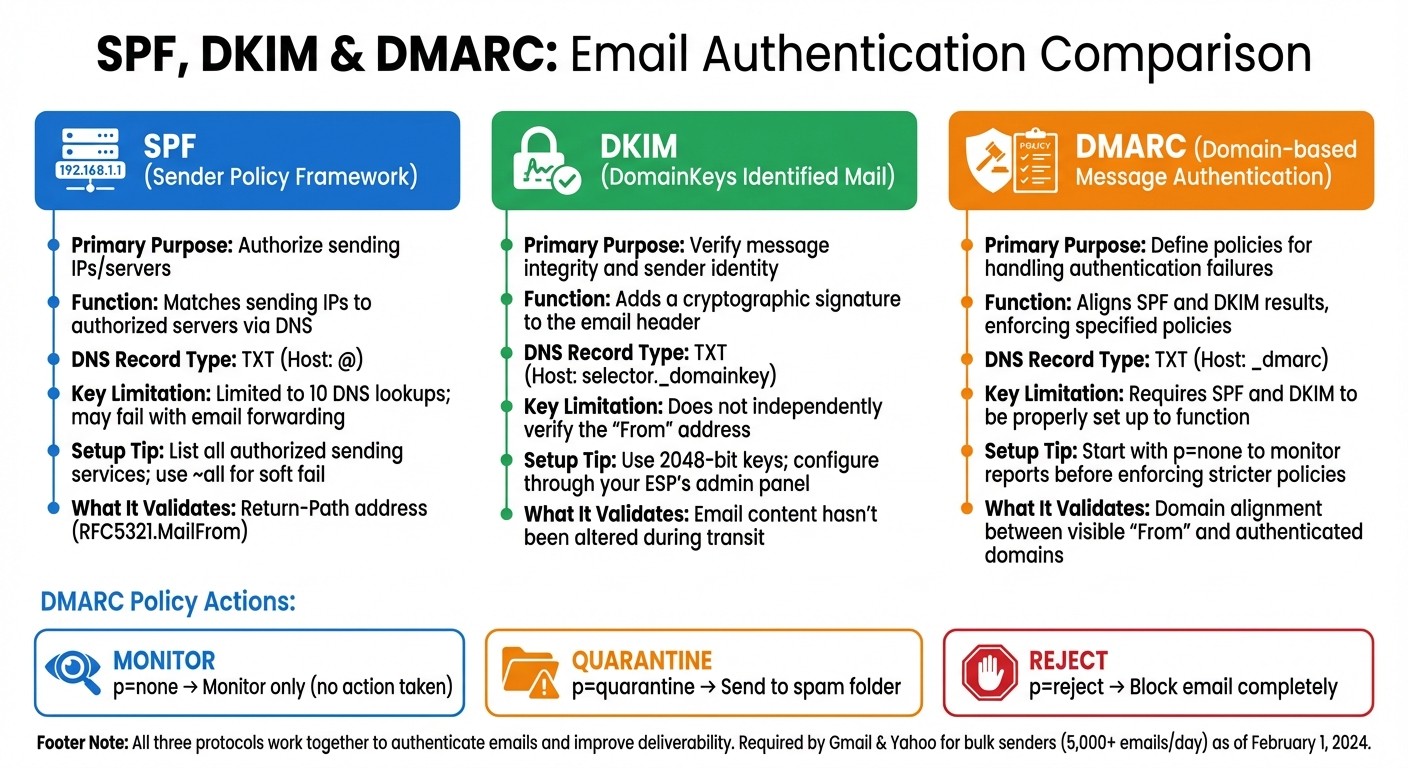
SPF vs DKIM vs DMARC Email Authentication Protocols Comparison
When it comes to protecting your cold email campaigns from spam filters and phishing, SPF, DKIM, and DMARC each play a unique role. While SPF ensures that only authorized servers can send emails on your behalf, DKIM uses cryptographic signatures to confirm that your email content remains unchanged during transit. DMARC acts as the final policy layer, guiding email servers on how to handle messages that fail SPF or DKIM checks.
These protocols don’t operate in silos - they work together to form a robust authentication system. Here's a quick breakdown of their roles and setup tips:
Feature | SPF | DKIM | DMARC |
|---|---|---|---|
Primary Purpose | Authorize sending IPs/servers | Verify message integrity and sender identity | Define policies for handling authentication failures |
Function | Matches sending IPs to authorized servers via DNS | Adds a cryptographic signature to the email header | Aligns SPF and DKIM results, enforcing specified policies |
DNS Record Type | TXT (Host: @) | TXT (Host: selector._domainkey) | TXT (Host: _dmarc) |
Limitations in Cold Email | Limited to 10 DNS lookups; may fail with email forwarding | Does not independently verify the "From" address | Requires SPF and DKIM to be properly set up to function |
Setup Recommendation | List all authorized sending services; use | Use 2048-bit keys; configure through your ESP's admin panel | Start with |
One common issue in cold email campaigns is domain misalignment. For example, if your email tool authenticates using its own domain but displays your company domain in the "From" field, DMARC may flag this mismatch. This often results in your emails being marked as spam. Ensuring alignment between the visible "From" domain and the domains authenticated by SPF or DKIM is critical.
When troubleshooting deliverability issues across platforms like Apollo and ZoomInfo, knowing which protocol to check can save time:
SPF: Investigate if emails are bouncing.
DMARC: Look here if emails are landing in spam.
DKIM: Check if emails appear altered.
Common Email Authentication Mistakes and How to Fix Them
Even with a proper setup, small errors can throw off your email authentication process. One of the most common and damaging mistakes is creating duplicate SPF or DMARC records for the same domain. When receiving servers detect multiple records, they treat them as invalid, leading to authentication failures. The fix? Combine all your SPF or DMARC records into a single, valid entry.
Another frequent issue is exceeding the 10 DNS lookup limit, which results in a PermError and invalidates your authentication. To avoid this, remove any unnecessary include statements or split high-volume sending across subdomains, each with its own lookup limit.
Domain misalignment is another common pitfall. For instance, if your SPF setup doesn't align the domain in the "From" address with the domain authenticated by SPF or DKIM, DMARC will fail. A typical example: if your cold email tool sends emails from its own servers but uses your company domain in the "From" field, DMARC will flag this mismatch, and your emails could land in spam. To fix this, ensure your cold email tool is configured to use your custom domain for both the visible "From" address and the Return-Path.
Prematurely setting your DMARC policy to p=reject can also backfire. Jumping straight to a reject policy without ensuring all senders are authenticated can cause legitimate emails to bounce. Start with a monitoring policy instead, as Google Workspace recommends:
"Start with a none policy that only monitors email flow, and then eventually change to a policy that rejects all unauthenticated messages."
Lastly, remember that every subdomain needs its own DNS records to protect your primary domain's reputation. DNS updates can take up to 48 hours to propagate globally, so be patient and use tools like MXToolbox to test your records and confirm changes.
Addressing these mistakes will help you maintain strong email authentication and improve your deliverability.
Testing and Monitoring Your Email Authentication
Regular testing and monitoring of SPF, DKIM, and DMARC records are key to ensuring your emails consistently bypass spam filters. Without these checks, you risk DNS changes disrupting your records or unauthorized senders exploiting your domain.
Tools for Testing Email Authentication
Several tools can help you validate and monitor your email authentication setup:
DNS Validators: Tools like MXToolbox, EasyDMARC, and Google's Check MX confirm that your SPF, DKIM, and DMARC records are properly published in DNS and follow correct syntax. They can identify common issues, such as duplicate SPF entries or errors in DKIM keys, before they impact email deliverability.
Live Testing Tools: Services like spamtester.ai and MailReach's spam test validate authentication by analyzing email headers in real inbox scenarios. For manual verification, you can send a test email to Gmail and use the "Show original" option to check for "PASS" results on SPF, DKIM, and DMARC.
Google Postmaster Tools: This tool is invaluable for monitoring spam rates and domain reputation for Gmail users. Gmail and Yahoo require bulk senders to maintain a spam rate below 0.3%, as measured in Postmaster Tools.
DMARC Report Analyzers: Platforms like DMARCian and DMARC Analyzer simplify the complex XML reports generated by DMARC. These tools turn raw data into actionable insights with user-friendly dashboards.
Global DNS Propagation Checkers: Use services like whatsmydns.net to confirm that DNS changes have propagated globally.
Automated Seed Testing: Tools like Instantly Inbox Placement can flag authentication issues before you launch campaigns, saving you from potential deliverability headaches.
Once you've confirmed your records are accurate, shift your focus to monitoring how your emails perform in real-world scenarios.
Tracking Email Deliverability Performance
Validating your records is just the first step. Monitoring actual deliverability gives you a clearer picture of how your emails are being received. DMARC reports are particularly useful for this. The rua (aggregate) tag in your DMARC record generates XML reports that show which IP addresses are sending emails on your behalf and whether they pass SPF and DKIM checks. Reviewing these reports weekly can help you spot unauthorized activity.
For cold email campaigns, aim for these benchmarks:
Delivery rate: 95% or higher
Inbox placement rate: 85% or higher
Spam rate: Below 15%
Bounce rate: Below 5% (anything higher may indicate outdated email lists or authentication issues).
Engagement metrics like opens, clicks, and replies are equally important, especially during the warmup phase of a new domain. Positive interactions help build a strong sender reputation.
Beyond technical checks, seed list testing provides insight into where your emails land - whether it's the primary inbox, promotions tab, or spam folder - across providers like Gmail and Outlook. You can also manually inspect email headers to ensure proper domain alignment by reviewing fields like "Return-Path", "From", and "Received".
For added vigilance, set up notifications through deliverability tools. Alerts via Slack or webhooks can notify you immediately of authentication failures or if your domain is flagged on a blacklist.
How Coldreach Handles Email Deliverability
Coldreach takes a hands-on approach to email deliverability, managing the technical side of things so you don’t have to. Unlike many platforms that leave users to figure out the infrastructure themselves - often leading to emails landing in spam - Coldreach ensures your messages make it to the primary inbox. This all-in-one system lays the groundwork for both technical and content strategies.
Coldreach's Managed Email Infrastructure
At the heart of Coldreach’s system is what they call a "Hardened Sending Stack." This setup is designed to behave like a trusted human sender, helping emails bypass spam filters. The process starts with aged domains, often more than 10 years old, which carry more trust with receiving servers than new domains. Spam filters consider domain age and ownership history when deciding whether to deliver an email.
Coldreach also uses dedicated IP pools instead of shared ones. Why does this matter? With shared pools, one bad sender can ruin the reputation for everyone else. Dedicated IPs keep your email reputation intact. On top of that, Coldreach handles DNS authentication for SPF, DKIM, and DMARC protocols, ensuring these critical systems are correctly set up.
"Authentication is especially important for cold emails because the first message you send to a prospect is held under particular scrutiny." - Hunter.io
The results speak for themselves. This year alone, Coldreach has sent over 3 million emails with an average reply rate of 3.8%. That’s nearly four times the industry average of less than 1%. For example, a staffing client sent 1,768 emails and received 103 replies, turning 34 of those into interested leads.
Why Coldreach Uses Plain-Text Emails
Beyond the infrastructure, the content of your emails plays a massive role in deliverability. Coldreach opts for plain-text emails, which avoid technical spam triggers and improve inbox placement.
"Plain text consistently outperforms HTML in deliverability tests." - Sales.co
Plain-text emails look and feel like personal messages - think of them as the digital equivalent of a handwritten note from a CEO. This approach helps them land in the Primary inbox, rather than getting stuck in Gmail’s Promotions tab.
When paired with properly configured SPF, DKIM, and DMARC protocols, this plain-text strategy helps Coldreach achieve over 90% placement in the Primary inbox. It’s this combination of technical precision and thoughtful content that keeps reply rates above 3%, even when targeting high-level contacts like Fortune 500 CISOs.
Key Takeaways on SPF, DKIM, and DMARC for Cold Emails
SPF, DKIM, and DMARC work together to verify the authenticity of your emails. Think of SPF as your email’s guest list, detailing which servers are allowed to send messages on your behalf. DKIM acts like a digital seal, ensuring your email hasn’t been tampered with during transit. DMARC ties it all together, instructing receiving servers on what to do with emails that fail these checks - whether to deliver, quarantine, or reject them. These measures are essential for ensuring cold emails reach their intended recipients.
When implementing these protocols, proceed carefully. Start with a p=none DMARC policy to collect reports without affecting email delivery. Once you confirm that all legitimate sending sources are properly authenticated, gradually shift to stricter policies like p=quarantine and eventually p=reject. Keep your SPF record within the 10-lookup limit to avoid errors - exceeding this limit can trigger a "PermError", breaking authentication. If you use multiple email services, consolidate them into a single SPF record rather than creating duplicates, which can lead to failures. This step is critical for maintaining smooth email delivery.
Regular monitoring is essential. Changes like switching email providers, adding new tools for outreach, or migrating DNS hosts can disrupt your authentication setup without warning.
For cold emails, proper authentication is even more important. Initial messages often face stricter scrutiny compared to regular correspondence. Starting February 1, 2024, Gmail will require bulk senders to implement SPF, DKIM, and at least a p=none DMARC policy while maintaining spam complaint rates below 0.3%. Outlook.com will enforce similar standards starting May 5, 2025. Without these measures, even the most carefully written cold emails risk being sidelined from the primary inbox.
FAQs
×
How do SPF, DKIM, and DMARC work together to ensure your cold emails are delivered?
SPF, DKIM, and DMARC are key email authentication protocols that work hand in hand to boost email deliverability and guard against spam.
SPF (Sender Policy Framework) ensures the server sending your emails is authorized to do so on behalf of your domain.
DKIM (DomainKeys Identified Mail) attaches a cryptographic signature to your emails, confirming they haven’t been tampered with during transit.
DMARC (Domain-based Message Authentication, Reporting, and Conformance) acts as the final layer, instructing receiving servers on how to handle emails that fail SPF or DKIM checks. It also generates detailed reports to help identify and resolve any authentication issues.
When set up correctly, these protocols establish trust with email providers, improve inbox placement, and lower the risk of your cold emails landing in the spam folder.
×
What happens if I don’t set up SPF, DKIM, and DMARC for cold emails?
Failing to set up SPF, DKIM, and DMARC can seriously undermine your cold email efforts. Without these email authentication protocols in place, your messages are far more likely to end up in spam folders, get rejected entirely, or never make it to the recipient's inbox. This can spike your bounce rates and take a toll on your domain's reputation.
On top of that, skipping these measures opens the door for phishing and spoofing attacks, where cybercriminals can fake your email address to deceive others. Not only does this hurt your email deliverability, but it can also damage your brand's reliability and erode trust with your audience.
×
How can I ensure my email authentication setup is working correctly?
To ensure your SPF, DKIM, and DMARC configurations are functioning as they should, follow these straightforward steps:
Check Your SPF Records: Use an SPF lookup tool to verify that your domain's SPF record is correctly set up and error-free.
Validate DKIM Settings: Test your DKIM configuration with a validator. Input your domain and DKIM selector to confirm that the public key is both accessible and accurate.
Confirm DMARC Configuration: Run a DMARC check to ensure your policy (
p=none,quarantine, orreject) is properly configured and that reports are being sent to the correct email addresses.Send a Test Email: Send an email to a personal account, such as Gmail or Outlook, and examine the email headers. Look for results like
spf=pass,dkim=pass, anddmarc=pass.Review DMARC Reports: Regularly analyze the aggregate reports sent to your DMARC email address. This will help you spot any issues or unauthorized email activity.
By consistently following these steps, you can fine-tune your email authentication setup, boosting deliverability and keeping your messages out of spam folders.
